Showing posts with label Herbalism. Show all posts

Monday, July 06, 2015

And Now for some Herbalism: Using St. John’s Wort in Herbal Cremes, Salves and Liniments

We are so lucky that St. John’s Wort (Hypericum perforatum) loves it here in the Sierras of California and has naturalized in profusion -- much to the consternation of county & state officials who have declared it a noxious weed.  Yes it is capable of producing undesirable effects in cattle who eat it in quantity.  In rare instances it can cause bovine dermatitis, photo sensitivity and what can be termed “insanity” amongst the herd if they gorge themselves on it.

St. John’s Wort (SJW) is one of the premiere tissue healing and pain relieving herbs.  It has a deep-seated nervine effect, helping to restore damaged nerve tissue, deadening nerve pain and strengthening the urinary organs.  The herb is very useful for treating athletic injuries with nerve damage and/or pulled muscles or ligaments.  “Hypericum,” which literally translates as “over an apparition” is a proven anti-depressant that definitely helps raise the spirits when taken internally.  It is known to stimulate photo sensitivity in predisposed individuals so one should not overdo taking it either internally or externally.


The fresh plant is wild crafted in late June as it blooms around St. John’s Day, June 24th.  An early spring will bring it on some weeks earlier, and if it’s allowed to grow in your garden and receive water, it will continue to produce flower heads as long as the plant is kept from going to seed.  I’ve picked it from my cultivated plants for many weeks into the late summer and sometimes get more from a few garden plants than I do from wild patches.

SJW Oil being processed into a
creme and salve


The leaves and 5 pointed yellow flowers are delicate and lacy looking, and when macerated fresh in oil will produce a most lovely and intense burgundy infusion.  These are the main compounds (hypericins) at work, producing that awesome burgundy color that you only get when the plant is fresh.  If you use the plant dried to make oil it comes out yellow green.


Fresh St. John's Wort, picked for class


It was still too wet after grinding,
we put it under a towel in the sun
Ordinarily I have a personal preference for making oil infusions with dried herbs, simply because there is less likelihood of the oil spoiling due to mold.  SJW is the ONLY herb to date that I will infuse fresh.  Pick it a few days before you make your oil infusion, especially if the plants are very green and juicy still, and allow it to slightly dry out a day or 2 before macerating.   If the plants are already drying on the stalk this will have to be taken into consideration, maybe don’t wait!


Pulsing works best, shake
the blender pot in between


I use a blender to macerate plant matter-- perhaps snipping it first with a pruning tool to coarse chop it a bit beforehand.  The red color you see is the release of the hypericins.  Also it is helpful to let the chopped plant matter sit under a towel in the sun for an hour if it’s still too moist to infuse after blending it.  Better to get the moisture quality right from the beginning.  I have a certain moisture quality I like, still somewhat fresh but going towards dry.


By the way I don't put them outside anymore, they go in a hot dark inside spot.

My standard oil infusing proportions apply when using SJW -- typically I will fill a quart jar 2/3 to 3/4 full of the chopped herb, then cover with oil(s) of choice to fill the jar.

And because the herb is stilll fresh there will be some moisture involved, so I like to cover the jar with a double layer of wax paper, secured by a mason ring, so that the oil can breathe and any condensation can evaporate rather than linger in a closed jar causing mold.    Often when working with SJW I usually will add lavender or something else aromatic like eucalyptus to up the antiseptic factor.

Oils with this kind of top need to be stirred carefully with a chopstick every so often rather than shaken.  Do stick it away for some months -- 2 at least.  The best SJW oil I ever made was on the infusion shelf for a year.

Definitely monitor it for color changes, it should turn a deep dark burgundy.  Press out after 2 months or so.  It can then be used as is as a wonderful  massage oil, or further processed into salve and cremes.

Finest SJW product, Creme and Salve


Some useful PROPORTIONS for Creme, Salve and Lip balm Making:

Cremes: 6 parts Oil, 1 part Wax, 1 part Water Infusion (or other liquid element like Liniments)

Note:  For small batches (under 2 cups oil) adjust wax down slightly.
Calendula and other high-resin botanicals may also change the viscosity of the original oil to be thicker, which also reduces the wax requirement slightly.

Salves: 2 1/2 or 3 parts Oil to 1 part Wax
                  Use slightly more wax for lip balm

Herbal creams, oils,  salves and unguents made with herbs such as Comfrey, Calendula, St. John’s Wort & Gotu Kola penetrate deep into tissues in their restorative work.  Herbal packs applied overnight are the most beneficial as they take advantage of the body’s natural healing processes going on during sleep.  Comfrey, St. John’s Wort and Calendula encourage cell regeneration and should never be applied to a deep puncture wound until danger of sealing in the infection is passed.


Make a matching Liniment product to use in conjunction with SJW Oil
What is a LINIMENT?  A liniment is an alcoholic extract that is applied topically, the benefit being that alcohol soaks right in, carrying the botanical properties deep into tissues.  You can also use liniments as the “water” or non-oil liquid element in your herbal cremes.  Now that was a fantastic development!!

Liniment in the making.
Those glass vodka bottles are great
for bottling Kombucha by the way
The alcohol makes the creme slightly more drying, but also gives it greater shelf life.  AND you can make matching oil and alcoholic infusions that can be used as stand-alone products or processed together for some very interesting creme combinations.

My preference is to use vodka for liniments as opposed to Everclear, mostly because I really like how vodka comes out when infused with things like lavender and some of the other aromatics.  Also because Everclear is really strong, it could burn the skin so I prefer something a little milder.  And vodka is inexpensive, which makes it easy to infuse a big ol’ jar of SJW and something when it’s in season, so that I have a decent amount to use and play with.


This year I’m going to make at least 2 and probably 3 SJW liniments -- one already going with red poppy, one with hot pepper and lavender and both of these will have matching oils; and probably one more, undecided at this time.   Something for the Itch.

St. John’s Wort goes well with:  Lavender, Comfrey, Calendula, Cannabis, Eucalyptus, Clary Sage, Red Poppy, Rosemary, Marigold, Helichrysm, Chamomile, Red Pepper, Basil.


I'll be having the annual SJW Creme Salve and Oils class on Saturday July 11th from 11-3 pm.  We will hopefully be able to create a couple of oils to be processed in a group setting later, plus press out and process a SJW blend made last July into both creme and salve, demonstrating the use of a liniment.  Plus lots of talk about the growing, picking and use of SJW and other botanicals good for creme making.


It will be a full 4 hours with a short food break, bring simple finger food and your herbal notebooks. Because I'm technically challenged at present, this blog will have to serve as the hand-out.


Happy St. John's Wort time!  It's a truly wonderful plant.


Thursday, January 22, 2015

Kombucha


Kombucha (pronounced properly Kom BOOO Ka I'm told) is a delicious healthful slightly fermented beverage made with black (or other) tea and sugar.   It requires a live culture called a scoby (Symbiotic Culture Of Yeast & Bacteria) to brew, and takes some days to prepare a good finished product.  It can be made with green, white, and other caffeinated/herbal teas, and flavored with just about anything.  I have good luck using black tea, ginger, and a very unprocessed raw sugar as the sweetener.


I love the stuff!  What a great drink!   It's not wasted on me that it was a prefered drink of the Samurai.  I include a link at the end with some wonderful history.  It made it’s way all over the East including Russia.  

For the tea drinkers in the crowd, how easy and wonderful to convert an already awesome ancient beverage into this probiotic powerhouse.

I started making it just over a year ago.  A friend gave me a culture the year before.  It sat in the fridge in a jar because I was intimidated by the process.  When I finally opened it to try it out, there were 2, and that was the beginning.  My favorite beverage in the wintertime has traditionally been hot ginger or chai tea.  But this winter, I’ve continued to drink kombucha all day and into the night.   With lots of ice, “like a scotch”. This would ordinarily be unthinkable to me but I’m not feeling chilled at all by it and continue to want it over hot ginger tea.  This tells me that it is indeed contributing to my inner fire.  

Okay so you gardeners out there know about compost piles, and how you can innoculate them with various beneficial strains of bacteria to speed up and enhance the decomposition process.  This is exactly what Kombucha does in your gut.  You are innoculating it with beneficial organisms that enhance the digestive fire and absorption process.  Truly this is creating an upward spiral of health and well being.  It helps with detoxification, it boosts the immune system, and depending on how you flavor it, it also provides additional nutrients.  

Personally I’m just thrilled to not only be drinking this delicious probiotic, but to be buying and eating more pineapples and mangos.  Since they are needed for flavoring kombucha batches, it also has me consuming more of them in the process, yum.

In order to succeed with Kombucha it does have some basic needs.  There is a range of temperature and pH that it requires -- go outside these parameters and the scoby will die and/or the batch will mold.  But once you can give it the right environment, and you monitor it every other day at least, success will happen.  Monitoring it is critical as Kombucha continues to develop and ferment even when it’s not being looked at. 


Store bought Kombucha is a much inferior product (in my opinion) to that made by an experienced home Kombucha maker.  What you get in the store has been heated, killing off most of the beneficial organisms.  Better to get a scoby and some tips from someone you know; that way you can tweak your recipes exactly to your tastes, quantity and needs.

I started making Kombucha with the following ingredients -- including ginger from the start, right into the tea mix.  That seemed to work very well, in fact the inclusion of ginger speeded up the fermentation process.


Kristine Lavender Love’s Recipe
13 cups water (to fill my favorite size pot)
9 or 10 good quality tea bags
1 cup raw sugar
2“ knob fresh ginger, chopped

Make Tea:  Put water, ginger and sugar in the pot and bring to a boil.  Add tea bags, remove from heat, brew and cool down. A faster method is to use half as much water to brew the tea, then when it’s brewed fill the pot with cold water to cool it all down.

Combine:  Strain and add to your kombucha brewing jars that contain your scobies.  Make sure the liquid is not too hot!

Cover and Brew:  I like to cover glass jars with a paper coffee filter affixed with a rubber band.  Kombucha needs to breathe at this stage, and the covering keeps out bugs and dust.  I also wrap the jars in different colored cloth, affixed with a clothespin, as it also likes to be kept dark and my brewing place is well lit.

Temperature:  I brew my jars on top of a Wedgewood stove (in the center).  The pilot lights underneath give it exactly what it wants, a range of about 75 to 90 degrees depending on where I put the jars, and I can move them around on the stovetop to more or less heat as needed.  I highly recommend bottom heat.  Kombucha mats are available commercially that provide exactly the right consistent temperature.

Monitor:  The strength of desired fermentation is up to each individual.  For many months I kept 2 2-qt jars going, and would decant one off after 5 or 6 days and drink it like that.  The ginger speeds up and enhances the fermentation process so it had a little bit of fizz at that juncture.  However you do it, it simply requires monitoring at this stage.  If it goes too long and continues to ferment it will become very acidic.  Too acidic for the scoby even, and your nice live culture will swoon (if you catch it in time) and/or die.  And added ginger will definately hasten the process.


Scoby Health:  A healthy scoby will regenerate some after every inclusion of fresh sweetened tea, there should be a whitish shiny layer on the top.   I have since read that you are to discard the bottom part of the scoby.  I have never done that, and all seems to be well.  Underneath the shiny new growth it tends to look like a yucky dish rag. That’s okay, as long as it still floats, bubbles and froths.  


Sometimes they go into a swoon  and linger on the bottom.  If you see this  
happening, especially early on, make sure your jar is warm enough.  Give it more heat and another 12 hours to float up; if it doesn’t respond with additional warmth, either dump the whole works out, or take the scoby out, rinse it and give it a new starter liquid.  If it doesn’t come up in a day it’s probably dead.  Hey, the great thing is these things regenerate, and making mistakes is part of it.  Turn your friends on to making Kombucha and you’ll always have scobies!

2nd Brewing:  The proper way to make Kombucha is, after about a week brewing with the scoby, you decant that off into a nice bottle, then let it sit for another week or so in a warm place to continue to ferment -- capped this time -- and it will produce this wonderful champagne-like fizz.  Take care to check your bottles every day to release excess pressure lest they start bursting in the night.  Yes it can happen.  Mango, peach and pineapple are real culprits.

Kristine’s Deviations

After I had so much success with ginger in the scoby I decided to experiment with other things.  Elderberry came next, then pineapple, mango, blackberry, cherry, strawberry, blueberry, raspberry, and a bunch of others that I found out I like less.  This is flavoring I put directly in with my scoby and brew it like that, then decant it off into a corked bottle for a few days to fizz up.

My method is simple.  You prepare the flavoring exactly the same way, whether adding it directly to the scoby jar, or at the time of decanting into the bottle to brew a second time. 


All my brewing jars are 2 quarts.  To flavor that quantity I use about 1/3 cup chopped fruit (I keep a stash in little baggies in the freezer) plus an additional heaping teaspoon or 2 of raw sugar, depending on the sourness of the fruit.  Place in a teacup, add a black teabag and fill the cup with hot water.  Stir, cool and strain into your appropriate brewing jar.  Then fill the jar with sweetened ginger black tea to replenish.  Carry on brewing!

Every third or 4th time I decant from a brewing jar I usually remove the scoby into a bowl and rinse it if there was a lot of sludge  (pineapple really produces this) and wash the jar.  They get yucky over time.   Then return the scoby and replenish with tea.


Now that I’ve discovered what fun flavors are I went crazy for awhile and had just too many going.  Some didn’t work as well.  What I’ve pared down to now as staples (and also based on how much I and others consume of it) on the stove brewing are the basic Ginger Black Tea, Elderberry, Blackberry, Pineapple, Mango, Cherry, and Strawberry-Blueberry.   And I also now decant them all off into nice bottles, which then go to a second brewing station by the woodstove, all covered up.   There I monitor them daily, taking what is ready for consumption.   I like to bring my traveling kombucha bar around with me.


Other Good Flavors:  At this time the way I play with new flavors is to add it to the Ginger Black Tea I decant off, rather than flavoring new scobies which is a risk.   If I find a flavor I really like and it seems to have the right pH, I might create a new, say, dragon fruit scoby.  However I’ve found that 7 brewing flavors on the stovetop is enough to work with, based on my consumption.  One also has to have a set of bottles to put it in.  Hey it’s a fine finished product, I don’t want to use mason jars, especially since I bring a travelling Kombucha bar around with me to Yoga Class, the Rec. Ctr., and music practice.  


I want folks to see a fine beautiful finished product complete with labels.  

People are less apt to try some strange fermented brew right out of an unlabeled mason jar than they are an array of beautiful clean clear bottles of different sorts filled with the various brilliant colors, with a nice label...... Just sayin’, know your audiences.

And by the way, if you have gotten a bottle of Kombucha from me, which I'm totally glad to do - please bring me the bottle back, it's very disconcerting to have bottle crises when there is a lot ready to decant and I've got them bursting in the night.  

A couple last flavoring tips -- one flavor that has become quite a hit in my world is Mango Cannabis.   You Medical Marijuana people, add the cannabis to your scoby-brewed Mango Kombucha at the time of decanting.  I used about a third of a cup crumbled bud to 2 quarts of liquid.  Also a couple spoonfuls of sugar.    Be aware that mango makes it very very fizzy.  This is a great, delicious, champagne-like adult beverage and a total hit with the musician crowd, which is usually the only place I have it.  


It’s party fare for Music Night for sure, with none of the gnarly side effects of either smoking it, or alcohol. 

Why Mango?   


Other flavors I’m working with are Cherry Vanilla (add a qtr. inch piece of vanilla bean to the decanted bottle of Cherry for 2nd brewing); Ginger Peach, plus Cardomom; Cran Elder Orange Spice; Pineapple Horehound Chai Spice; and various combinations of Blackberry, Elderberry, Strawberry, Raspberry and Blueberry.


I’m also contemplating some very VERY herbal Kombuchas that target specific illnesses.  It is a carrier medium par excellence, not to mention very elevating to the immune system.  More to come from that direction.


Here's some very interesting info on the origins of this wonderful beverage.

http://www.kombuchacultures.com/kombucha_history.html


Kombucha History

It is thought that Kombucha mushroom, a fermented yeast enzyme tea, originated in Asia during the Chinese Tsin dynasty in 212BC. This Eastern Tea was referred to as the Remedy for Immortality or the tea of Immortality. With the extension of trade routes it spread to India and Russia through travelers and traders. Kombucha resurfaced in Japan between the Wars after a Japanese visitor to Kargasok (Russia) found this fermented tea drink responsible for their astonishing health, longevity and well-being. It may have been introduced to Japan by a Korean physician by the name of Kombu around 415 AD. Today the tea - once routinely used by Samurai - is widely used again in Japan. Kombucha appeared in Germany about the turn of the century from Russia. This fermented tea drink became quite popular across Europe until World War II with the shortage of tea and sugar.

For hundreds of years a tea has been made from Chaga (a birch-tree mushroom) by the Russian peasants of the Alexandrove district near Moscow to cure cancer. There is speculation that the Kombucha mushroom is related to the Birch-tree mushroom.

Wherever this tea originated from it is now known throughout the world.  Kombucha Mushroom tea has been known by many names in many cultures. In 18th century Russia it was known as Cajnyj Kvas, in China as Cha Gu, in Germany as Heldenpilz.
Over all these years many stories have been told of how this fermented tea beverage, Kombucha has appeared to have performed miracles. Hence names such as miracle fungus, magical fungus, elixir of life and gout tea.

There are reports from several different countries of the use of Kombucha tea. The fungus is given local names in various countries such as: Russian Fungus, Japanese sponge, the Divine Tsche, Mongolian wine, Indian wine, Fungus Japonicus, Pichia fermentans, Cembuya, Orientalis, Combuchu, Tschambucco, Volga Spring, Mo Gu, Champignon de longue vie, Teekwass, Kwassan, pseudo lichen and Kargasok Tea, Scoby, kochakinoko.

Kombucha Scoby Candy ??!!

Yes you can actually make candy out of what looks like a yucky thing!  More to come on that front!!


If anyone is interested, Autumn Andahl and I are giving a workshop up in RRFlat this weekend that will feature Kombucha, Fire Cider and home made laundry soap.  Autumn does it the traditional way and has great product.  We'll both be presenting our methods, contact her to register.


Happy Brewing!


Friday, September 12, 2014

And Now For Some Herbalism: Black Elderberry, Premier Anti Viral of the Sierra


Tinctures, Glycerites, Acetums, Tonic and Kombucha
Sept. 2014  Class Handout


 For many people the onset of winter and change of season also means the dreaded onset of colds and flu.  Nobody likes to go down with a cold and have it morph into something more serious like a sore or strep throat, flu, whooping cough,bronchitis or pneumonia.   Or worse.


More than ever before, modern research is revealing not only the abject irresponsibility and ineffectiveness of mainstream flu shots and pharmaceutical drugs to keep seasonal related illness at bay, but also that the real cures and remedies truly are time honored and proven botanicals such as elderberry, horehound, ginger, cardamom, garlic, echinacea -- and the list goes on across cultures, geographical regions and time.

Here in the Sierras we are blessed to have so many of Nature’s most potent medicinal plants for colds and flu grow easily and/or naturally.  This particular document focuses on using Black Elderberry and Flowers in various preparations for winter wellness.  I have been developing recipes over the last 7 years in order to find easy and effective ways to use these botanicals and see how they work.

In the last years I’ve made many tinctures & tonics both in a class setting and on my own at home, and have given them out freely for people to try.  The feedback, when I got it, especially from people who actually had immediate need for the product, was overwhelmingly and astonishingly positive, with nearly everyone reporting that healing and positive change had taken place in a very short time.  Many people said they did not get sick, even though when they received some tincture they felt like they surely were going to be ill.

Others reported a general increase in overall wellness.  This category of people was not immediately sick but rather had long term low grade respiratory debilitation of some sort, such as lingering cough, bronchitis, smoker’s hack and cigarette or pot addiction, or low grade chronic sore throat.

Because these products and recipes were so effective in either flat-out stopping a cold or flu or speeding up the healing process, it is important that people are aware of how to create their own powerful medicinals to have on hand for winter and change of season.  These are things our great grandmothers and many before them knew.  How lucky we are that the old knowledge lives on, it means so will we.


After several years of being frustrated with the rapid spoilage rate of homemade Elderberry syrup, I’ve since expanded my repertoire to include numerous alcoholic tincture blends, glycerites, acetums, kombucha, tea and hopefully soon to try a candy/throat lozenge.  This document contains various notations that can be used to make your own recipes.  Sorry for the absence of quantities in some instances but that is my m.o. when I work alone many times.  It frees one to develop one's own formulas.  Along  those same lines, one of my herb lady friends tells me that she adds cloves to her elderberry syrup, which she says has greatly increased it's shelf life once the container is opened.


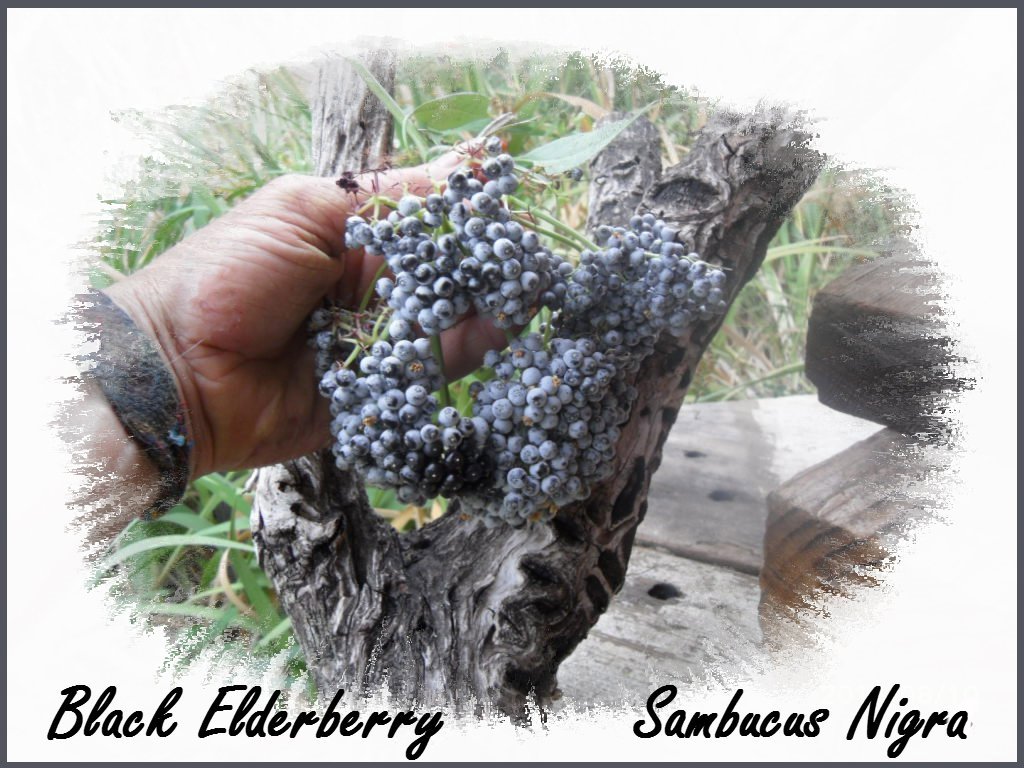
Black Elderberry (Sambucas nigra), ---Synonyms---Black Elder. Common Elder. Pipe Tree. Bore Tree. Bour Tree. (Fourteenth Century) Hylder, Hylantree. (Anglo-Saxon) Eldrum. (Low Saxon). Ellhorn. (German) Hollunder. (French) Sureau;  should not to be confused with Red Elderberry and other ornamental varieties.  It is a hardy perennial bush/tree that can happily naturalize in the Sierra Foothills landscape and has been used in folk medicine for centuries.

The bush is found in both Europe and North America, where it is considered an “elder” plant by Native American healers.  Both drought and cold hardy, it produces prized anti-viral blossoms and berries that beneficial insects and birds love.   While all parts of the plant can purportedly be used, this document focuses exclusively on blossoms and fruit.


A note on cultivation:  I have been under the erroneous assumption that elderberry easily makes it out in the wild of the Sierra.  It DOES make it, but only under the condition that it’s tapped into a water source of some kind -- otherwise we would see them everywhere like blackberries.  It is simply not the case.  I found this out the unfortunate hard way by not watering my large prolific bush in the back yard as it went into the fruiting cycle 2 years in a row now.  Since we are in long term drought in CA, it absolutely needed extra, regular watering starting in May.  This I neglected to do and got nothing but one small handful of fruit this year, and it had been loaded with blossoms.


Do take care when working with black elderberry that twigs, leaves, stems and seeds are all removed before ingesting.  The seeds and unripe berries are toxic, as are the leaves but less so.  Also the fresh juice is said to be toxic if ingested unheated, although tinctures and glycerites featuring the slightly drying berries do not seem to be a problem.  However I am careful now to remove all leaves and stems from the blossoms.


Black elderberries can be prepared in a variety of ways besides tinctures, including elderberry syrup (which is delicious but I find it spoils quickly after opening the jar), elderberry wine or cordial, or the flowers and dried berries can both be used as tea ingredients.  My favorite way to use both is in tincture form, although the blossoms are deliciously fragrant and wonderful in all kinds of tea blends and said to be delicious dipped in egg and fried as a fritter.


Elderberry has been used by native tribes and Europeans in many forms as an immune booster and general tonic throughout the ages and is a time-honored anti-viral remedy for colds and flu with virtually no harmful side effects if prepared and taken properly.  And based on the overwhelmingly positive feedback I’ve gotten after several years’ worth of making products and handing them out, I can honestly say that it is one of the most potent botanicals I’ve ever tried to knock the socks off colds, flu and viruses.  Everyone should have it in their medicine cabinet.


Common Herbalist Terms:

Acetum:  Herbal extraction using vinegar as the medium.
Anti-viral: Inhibits viruses
Anti-inflammatory:  Reduces swollen, inflamed, irritated, over-heated tissues.
Decoction:  A concentrated water based extraction of plant matter that is made by simmering harder plant parts like roots, seeds, twigs and bark over a low heat until the liquid is concentrated and reduces down.
Decant:  To strain out and separate botanical matter from the infusing medium.  It usually refers to the final step in tincture preparation where the initial pressed-out tincture is allowed to sit overnight and then the clear liquid is poured off or decanted into a clean bottle leaving the sludge-like layer of dregs to be discarded.
Glycerite:  An herbal extraction in vegetable glycerin, which is sweet and non-alcoholic, great for kids.
Dregs:  Plant matter left over after decanting a tincture or pressing out an infused oil.
Infuse:  The process of allowing a carrier medium like water, oil, or vinegar to take on properties of plant matter, resulting in products like brewed tea, salad dressing, or other herbal oils. It usually involves a heat process of some sort.
Infusion:  An oil or water based extraction of plant matter
Macerate: To chop or cut botanicals into small bits so that an optimal amount of surface is exposed for purposes of infusing in some sort of medium or menstruum such as oil, alcohol, vinegar or glycerin.
Tincture:  An alcohol-based extraction of plant matter.


Elderberry Products for 2014


Elderberry Tincture for Colds ‘n Flu 2014:

Dry Elderberry, 1 cup
Dried Blossoms, 1/2 cup
Dried Echinacea Root, 2 TBSP
6 fresh Peppermint stalks
32 fresh Blackberries
10 sm. fresh Rosehips
4 fresh Peruvian Goldberries
In a bottle of Everclear


Just Elderberry Acetum
1 1/2 cup Elderberry on the fresh side
1/2 cup dried Elder Flowers
in 32 oz Bragg Apple Cider Vinegar


Savory Elderberry Acetum
1 sm. bulb garlic
1/2 cup fresh Elderberry
1 very hot Pepper
1 inch knob fresh ginger, peeled and chopped
sm. handful dry Turkey Tail Mushrooms
sm. bunch dry Savory
1 tsp. yellow Mustard Seed
in 16 oz Bragg Apple Cider Vinegar


Elderberry Glycerite
1/2 cup Elderberries on the fresh side
1/2 cup fresh Chocolate Mint
1/2 cup dry Elder Flowers
in 16 oz Vegetable Glycerin


Elderberry Tincture for Hot Fever/Colds/Flu

 1 cup Elderberries on the fresh side

1/2 cup dry Elder Flowers
1/4 cup dry Echinacea root
4 heaping tsp. dry Boneset
in a bottle of Everclear



Elderberry-Ginger-Horehound in Brandy
1/4 cup (scant) fresh Horehound leaves
1 cup Elderberries on the fresh side
1/2 cup dry Elder Flowers
3“ knob fresh Ginger, chopped
in Brandy


Elderberry-Ginger Kombucha 

(Note:  You may have to really cultivate a scoby that will take to it.  If it floats and froths, it's working.)

2 qt mason jar with small mouth
a little less than 2 qts water
2 inch knob fresh ginger
1/2 teaspoon dried elderberries
1/2 tp 3/4 cup sugar (I like that Sugar In The Raw)
4 strong or 6 weak teabags (Tetley makes very full strong round teabags of a robust tea, others are wimpy.  They are NOT all equal)

Bring the water with herbs and sugar to boil, turn off and toss in tea bags.   Brew until cool enough to introduce it to the scoby.  Strain and pour in when cool.  Cover jar top with a layer of paper or cloth towel and rubber band, and wrap a cloth napkin around the jar to keep it dark.  I put mine on my stove top, the pilot light keeps the surface a PERFECT temperature -- maybe 75 10 90 degrees F.  Whatever, it's consistently perfect.  I think it brewed 5 days on the stovetop.

Your batch will fail without the right consistent heat element.   If your scoby fails to come up and float, it's dead probably.  Very discouraging but keep trying if you have extra scobies.  I took a layer off a fat one that consistently made ginger-black tea kombucha (all I make really) in one step, so it already was tuned to ginger.  And the antiseptic properties of ginger are helping too probably.

I also like the small mouth jars because it forces the regenerating scoby to produce it's layers underneath, rather than spreading out to the surface of a big jar opening, which is often yucky.

Decant into a clean bottle after 5-7 days.  Note that because elderberry is a sour, bitter fruit, and the fermentation process tends to sourness, more sugar may need to be added to taste at the time of decanting.  Taste it at this juncture.  Also extra sugar added at decanting will help it fizz up.

Put the bottles in a warm dark place, doing fizz relief on the cork or bottle top EACH day (or they may explode if you are not using flip top growler bottles), for another 5 to 7 days or so, or until the right fizziness is acheived.

I also recently have combined elderberry and blackberry/raspberry kombuchas at the time of decanting into a bottle, it's a delicious blend.  Elderberry pineapple is also very good.

"Cheers!!" Eldeberry Ginger Kombucha served on the rocks like a scotch

 How to make an Herbal Alcoholic TINCTURE:


Tinctures are super easy, compared to many other herbal preparations.  There isn’t much room to goof up.  They typically don’t spoil or get mouldy in process.  The procedure is very simple:  Macerate.  Acquire plant matter, chop up or coarse grind in a blender, fill a jar 1/2 to 3/4 full, and cover completely with booze (your choice) or another extraction medium.  You have just created a maceration.


Let it sit in a warm dark place that is neither too cold or too hot for 3-6 weeks or more.  Shake or stir frequently with a wooden chopstick.  Decant when it’s done.  First do a gross decanting (straining) into a bowl or jar, let it sit overnight so that fine particles can sink to the bottom, then pour off the good liquid into a final clean bottle, discarding the sludge.  Do label and date your tinctures clearly and store out of sunlight.

How to Choose the Booze:
It is totally up to the tincture maker, though I find I exclusively prefer Everclear, which is grain alcohol, for the majority of my extractions.  It just produces the most potent medicinals.  Brandy I also use as a preservative ingredient for tonics as well as for several tincture blends I like to make.  Taste is always a factor, as well as the potency.   Vodka I do not care for at all in orally taken tinctures but am finding it works great for liniments.  Rum would be my next choice after Brandy for alcoholic tinctures/tonics.

Everclear costs $20 a bottle at Senders Market in Mtn. Ranch, I highly recommend trying it.


Tinctures can be made with most botanicals, although you will want to do some research and find out
if alcohol really is the best extraction medium.  For example, comfrey is best extracted by water rather than alcohol or oil.  And Purslane precipitates out of solution in alcohol, as it also prefers water or vinegar.  Mints tincture well but are abysmal in oil infusions.  These are things one learns through trial and error, as well as research.


Vegetable glycerin is interesting and has some properties peculiar to it;  It’s an ideal extraction medium for tinctures made for children as it’s sweet tasting and non-alcoholic.   However it prefers to take the botanicals on the fresh side rather than dried.  I buy Vegetable Glycerin at Gold Trail Health Food Store in Jackson, CA, it’s around $14 for a 16 oz  bottle.


Acetums are a new wonderful addition to my herbal arsenal.  They are a true Food as Medicine staple now in my kitchen, with different blends evolving for different seasons.  Use what’s out there, pick the summer herbs to dry to make blends for winter use.  An herbal acetum is a great base for salad dressing, or sprinkle on rice and veggies, potatoes, eggs, in soups, they are delicious.  Be sure and use Bragg Apple Cider Vinegar as it is a live culture.


How and when to take alcoholic tinctures:
There is a whole science of exactly how much tincture one should take according to body weight.  If you have extreme doubts, by all means follow that.  You will have to google it.  Here is one set of guidelines:


DOSING GUIDELINES FOR HERBAL TINCTURES
from the website myhealingpath.com
The Healing Path Herbal tinctures can be taken in accordance to “body weight”. For every 50 pounds of body weight – take one dropper full of tincture. If for some reason you should skip a dose simply double the next dose.
     
The general guideline is as follows:

 30 pounds = 15 * DROPS two times daily
*Drops not droppers full
 50 pounds = 1 Dropper full two times daily
100 pounds = 2 Droppers full two times daily
150 pounds = 3 Droppers full two times daily
200  pounds = 4 Droppers full two X’s daily
250 pounds = 5 Droppers full two X’s daily
300 pounds = 6 Droppers full two X’s daily

I have an alternative methodology that also works.

When:  If you feel you are coming down with something, that is the optimal time to start on a non-toxic, medicinal wellness tincture like an elderberry or horehound blend because in many cases the cold or flu will be nipped in the bud and never materialize.

I have made and continue to make a variety of wellness tinctures featuring these 2 herbs to be taken in a low dose, tonic fashion, as the basis for daily on-going respiratory and immune support.  Other strong blends like turkey tails, garlic, usnea moss and other anti-biotic and anti-virals I save for when I really need them.

How Much:  The thing with herbals is you have to get enough into your system at first, so I recommend taking half filled droppers of something like elderberry tincture every half hour for the first 6 hours one feels sick.  This is for an average sized adult, certainly use less for a smaller being. Symptoms may start moving around quickly, with lots of mucous releasing.  It speeds things up.

Taper off as the symptoms really recede, maybe going to half as much for a couple days, slowly reducing as the bug goes away.  Start using the tonic right away if there are throat issues.  This tonic (recipe below) can be used as a cough syrup as well as an on-going low dose immune booster and respiratory aid, especially if there is an entrenched cough.


 If it’s a bad tasting tincture you are using, make a drink with tomato or other juice, or hot tea, so that you can take it.   You may be amazed that your body will actually find something that ordinarily would taste nasty to taste not bad when you need it!  And by the way, the following tonic recipe tastes very good!  Especially with the addition of pomegranate or cranberry.


Basic HoreHound Ginger Respiratory Tonic Recipe
 with Elderberry

This recipe is based on a particular size ceramic pot I have for making small batches of decoctions.  It holds about 6-8 cups of water.   Herbs are best processed in glass pots as some botanicals can cause metal to leach into the mixture.  Many of the lesser ingredients can be varied, but I would always include the ginger, horehound, cardamom, comfrey and any immune system boosting herbs like astragalus and echinacea root that I could find.  Note also that echinacea purpurea, while not as potent as echinacea angustifolia, will do fine.

Step 1:  Make the decoction by bringing 6-8 cups water to a boil.   Add the following:

2-inch knob of fresh ginger, chopped
I heaping TBSP dried elderberry
1 tsp. cardamom seed (if using whole pods use a good heaping TBSP)
1 cinnamon stick
10 cloves
1 tsp. coriander seed
1 tsp. black peppercorns
1 tsp. fennel seed
2 TBSP Astragalus root
2 TBSP Echinacea root
2-4 small pieces dried yellow dock root
rind of one organic lemon (squeeze and reserve the juice for later)
10 small pieces dried Comfrey root or the fresh root of a mid sized Mallow plant, dug, washed and chopped.

Simmer all ingredients until the water is reduced by half, usually 2 hours or more.

Step 2:   Add the more delicate leafy botanicals (and fruit bits) and infuse
scant 2 cups chopped fresh White Horehound
1 tsp dried Yerba Santa
Optional ingredients when not using elderberry --
1/3 cup dried pomegranate, pineapple or cranberry bits

Make sure it comes to a boil, stir it around to incorporate all the leafy matter, cover and remove from heat.  Allow to steep for an extended period of time.  Can sit there overnight and be fine but I wouldn’t go longer than 16 hours or so.

Step 3:  Strain, add sugar and reduce down again.
Strain out the liquid using a fine mesh strainer.  Rinse out the pot, and return the strained liquid, measuring it as you go.  I usually add about half (or less) as much sugar as I have liquid.  It’s up to you.  Reduce it down again by 1/3 to 1/2.  It should be a semi-syrup.


Step 4:  Add Brandy and Lemon
Pour into a jar (yes, measure and write it down), add 1 cup Brandy and the strained fresh juice of 2 lemons.


Keep refrigerated.  It will keep many weeks or months if kept cold and not contaminated by dipping the spoon repeatedly in.

When and how much to take:
This is a product that can be taken every day as needed.  It’s particularly good for soothing and knocking out a nagging cough or ragged throat.  It gives the immune and respiratory systems a little added extra boost in the direction of wellness in a low dose fashion.   Take it by the tablespoonfuls as needed, one or 2 spoonfuls at a time.  I have also carried it around in a dropper bottle for a bad cough but the lemon juice does degrade the unchilled product.  I have made this a whole bunch over the course of some years and have a good handful of people who now request it.  It’s a very nice and useful product.

For Further Reading and Research:
http://naturalsociety.com/black-elderberry-natural-cold-flu-treatment/
http://www.thedailysheeple.com/elderberry-extract-natures-tamiflu_012013
http://www.topsecretwriters.com/2013/04/elderberry-cold-medicine-companies-may-not-want-you-to-know/
http://botanical.com/botanical/mgmh/e/elder-04.html
http://www.wildplantforager.com/1/post/2013/05/5-delicious-elder-flower-recipes-other-than-just-syrup.html
http://honest-food.net/veggie-recipes/sweets-and-syrups/elderflower-liqueur/
http://www.pinterest.com/floralmedleys/elder-flower-recipes/
http://honest-food.net/2012/04/27/elderflower-cordial-recipe/
http://botanical.com/botanical/mgmh/e/elder-04.html
http://www.stepintomygreenworld.com/greenliving/greenfoods/a-natural-flu-shot/
http://showmeoz.wordpress.com/2013/08/20/a-walk-on-the-wild-side-elderberries/
http://preventdisease.com/news/14/060414_Elderberry-Extract-Outperforms-Medication-By-Inhibiting-Growth-Pathogenic-Bacteria-99-Percent.shtml


Be Well!!